[Day 29] Kotlin + Spring Boot : TDD in CRUD
今天主要要透過不專業的 TDD 來做 CRUD 的開發(盡量??)!
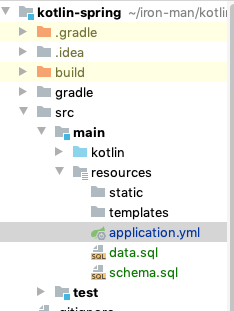
設定 H2 DB
因為我是使用 H2 DB 來 demo 這次專案, H2 可以透過在 resources 下放入,schema.sql 以及 data.sql 來初始化 H2 DB
schema.sql
DROP TABLE IF EXISTS user;

CREATE TABLE user (
    id INT AUTO_INCREMENT PRIMARY KEY,
    username VARCHAR(300) NOT NULL,
    password VARCHAR(300) NOT NULL,
    email VARCHAR(100) DEFAULT NULL
)
data.sql
INSERT INTO user(password, username, email) VALUES('1234', 'tim', 'tim@gmail.com');
如果已經定義好了 entity 也可以透過 jpa.generate-ddl = true 來自動產生 db schema。
這裡我是關掉的,因為目前是透過 schema.sql 產生的
spring:
  datasource:
    ## db 資訊
    url: jdbc:h2:mem:testdb
    driverClassName: org.h2.Driver
    username: sa
    password: 1qaz2wsx
  jpa:
    database-platform: org.hibernate.dialect.H2Dialect
    ## console 中 顯示 jpa 產生的 sql
    show-sql: true
    ## generate-ddl 是否透過 entity 產生 db schema
    generate-ddl: false
    ## Hibernate ddl auto (create, create-drop, update), 是否隨著 entity 更新,update 保留 data
    hibernate:
      ddl-auto: update
  ## 啟動 http://localhost:8080/h2-console  h2 db 管理介面
  h2:
    console:
      enabled: true
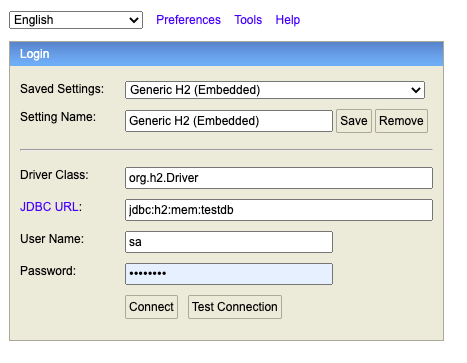
啟動 server 後,網址進入 http://localhost:8080/h2-console ,會看到登入畫面,輸入帳密後就可以看到 table 和資料啦~
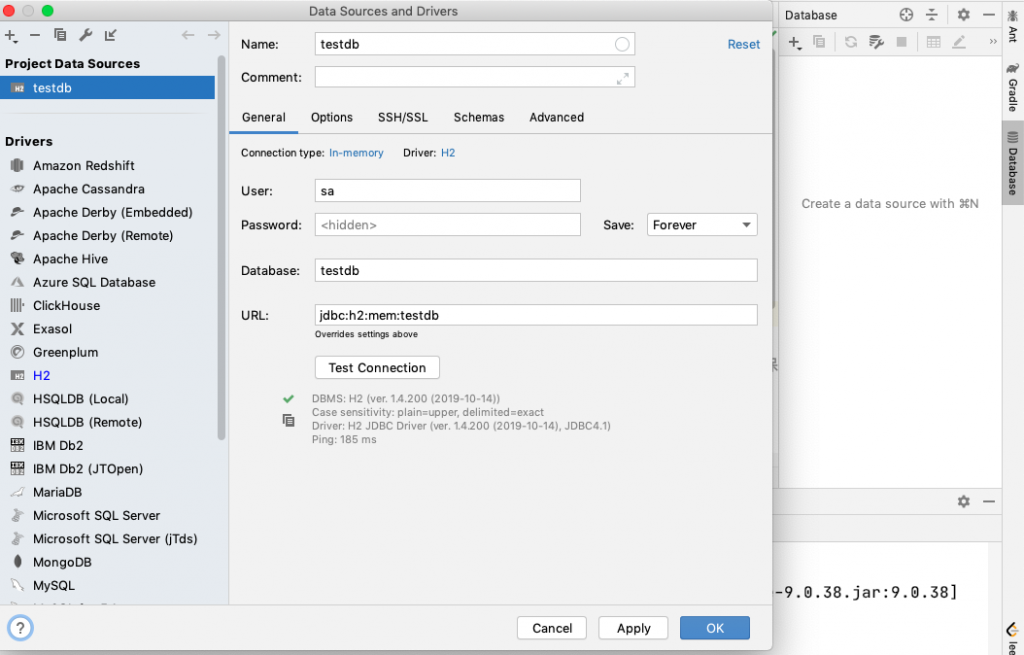
或是透過 IntelliJ IDEA 的 database 連線也可以
Entity
這裡先定義了一個簡單版的 User.kt 的 Entity
@Entity
@Table
class User(
        var username: String,
        var password: String,
        var email: String? = null,
        @Id @GeneratedValue(strategy = GenerationType.SEQUENCE) var id: Long? = null)
Spring Data JPA 不建議使用 data class
Entity 這塊是官方文件跟其他網路文章最大差異的地方,官方是特別建議針對 Spring Data JPA 不建議使用 data class
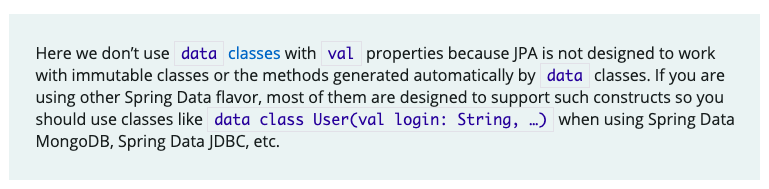
內文提到 JPA 並不是為了 immutable class 或 data class 產生的方法設計的,但如果是使用 Spring Data MongoDB, Spring Data JDBC 等等使用 data class 是沒問題的。
由 Kotlin Koans tutorial 的影片教學裡面是提到說,因為像是 null 其實在 JPA 也代表很重要的 trasient 狀態,代表資料還未跟 db 映射,所以不推薦使用 data class,不過...好像大多數狀況下,是沒啥問題啦...XD
關於 JPA 的狀態可以參考這篇: https://jstobigdata.com/jpa/different-states-of-an-object-in-jpa/
TDD
db 和 Entity 建立好後,遵循 TDD 的開發方式,當然是先來寫測試,本人也是剛入門 TDD 有錯請指教阿~。
這裡開始就會做 client 端的測試,比較偏向整合測試,所以這裡是使用 TestRestTemplate 來測試 RESTful API。
@SpringBootTest(webEnvironment = SpringBootTest.WebEnvironment.RANDOM_PORT)
internal class UserRestControllerTest(@Autowired val restTemplate: TestRestTemplate) {

    @Test
    internal fun `test findByUsername `() {
        val user = restTemplate.getForEntity<List<User>>("/api/user/tim")

        // 測試 200 ok
        assertEquals(HttpStatus.OK, user.statusCode)

        // 測試 header MediaType.APPLICATION_JSON
        user.headers.contentType?.let {
            assertTrue(it == MediaType.APPLICATION_JSON)
        } ?: fail("Content type header is not application/json")

        // 測試名字
        assertEquals("tim", user.body?.first()?.username)
    }
}
@SpringBootTest(webEnvironment = SpringBootTest.WebEnvironment.RANDOM_PORT)
使用了任意的 port 來測試,避免跟已經開啟的 server port 衝突,這樣就寫好了第一個測試。
紅燈
當然來跑一下,是不會通過測試的

程式實作
Repository
首先利用 JPA gen code 的方式,來實作 UserRepository 的內容,特別注意,這裡不需要加上 @Repository 的 annotaion 了!其實我之前都還一直傻傻的加上XD
interface UserRepository : JpaRepository<User, Long> {

    fun findByUsername(username: String): List<User>

}
Service
UserService 要標註 @Service,透過 constructor 注入 UserRepository。
這裡只是簡單了呼叫 UserRepository 的方法,但將來還有更多的商業邏輯會寫,所以還是保留 service class。
@Service
class UserService(val userRepository: UserRepository) {

    fun findByUsername(username: String): List<User> = userRepository.findByUsername(username)
UserRestController
UserRestController 要標註 @RestController,透過 constructor 注入 UserService。
這裡採用了 @GetMapping 提供 get 方法, 參數透過 url 帶入,所以使用 @PathVariable 帶入這個參數後,在程式內呼叫 service.findByUsername(username)
這樣就完成了!
@RestController
@RequestMapping("/api/user")
class UserRestController(val service: UserService) {

    @GetMapping("/{username}")
    fun findByUsername(@PathVariable username: String): ResponseEntity<List<User>> =
            ResponseEntity.ok(service.findByUsername(username))按下測試
測試失敗!
按下 internal fun test findByUsername() 左邊的綠色按鈕測試,對...我發現測試失敗,所以一樣按左邊的綠色按鈕的 debug 按鈕和下中斷點在測試 200 ok 那行,觀察一下拿到的 user 會長怎樣
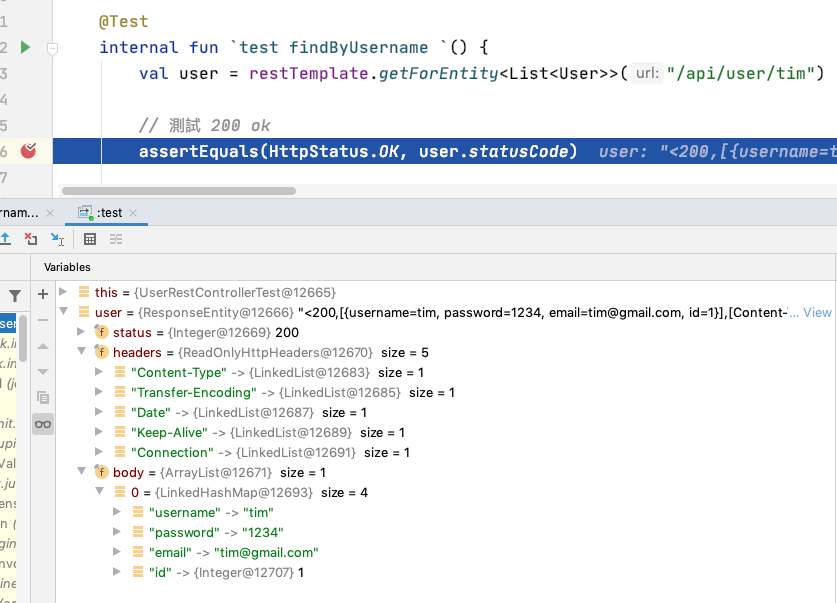
會一直出現這個錯誤
class java.util.LinkedHashMap cannot be cast to class com.tim.kotlinspring.entity.User (java.util.LinkedHashMap is in module java.base of loader 'bootstrap'; com.tim.kotlinspring.entity.User is in unnamed module of loader 'app')
java.lang.ClassCastException: class java.util.LinkedHashMap cannot be cast to class com.tim.kotlinspring.entity.User (java.util.LinkedHashMap is in module java.base of loader 'bootstrap'; com.tim.kotlinspring.entity.User is in unnamed module of loader 'app')
at com.tim.kotlinspring.controllers.UserRestControllerTest.test findByUsername $kotlin_spring(UserRestControllerTest.kt:41)
at java.base/jdk.internal.reflect.NativeMethodAccessorImpl.invoke0(Native Method)
at .........
debug 後我是把程式修改成這樣了
@SpringBootTest(webEnvironment = SpringBootTest.WebEnvironment.RANDOM_PORT)
internal class UserRestControllerTest(@Autowired val restTemplate: TestRestTemplate): Logging {
private val objectMapper = ObjectMapper()
@Test
internal fun `test findByUsername `() {
val response = restTemplate.getForEntity<List<User>>("/api/user/tim")
// 測試 200 ok
assertEquals(HttpStatus.OK, response.statusCode)
// 測試 header MediaType.APPLICATION_JSON
response.headers.contentType?.let {
assertTrue(it == MediaType.APPLICATION_JSON)
} ?: fail("Content type header is not application/json")
// 測試名字
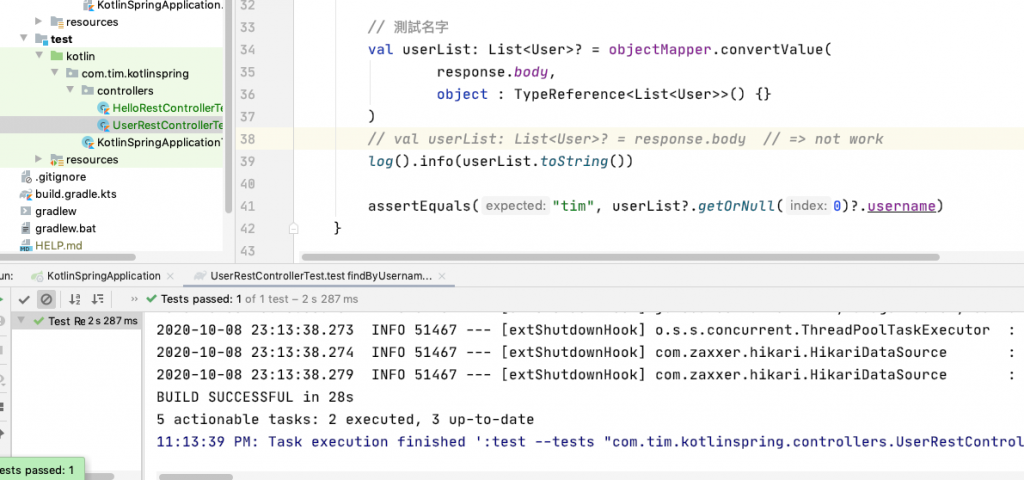
val userList: List<User>? = objectMapper.convertValue(
response.body,
object : TypeReference<List<User>>() {}
)
log().info(userList.toString())
assertEquals("tim", userList?.getOrNull(0)?.username)
}
}
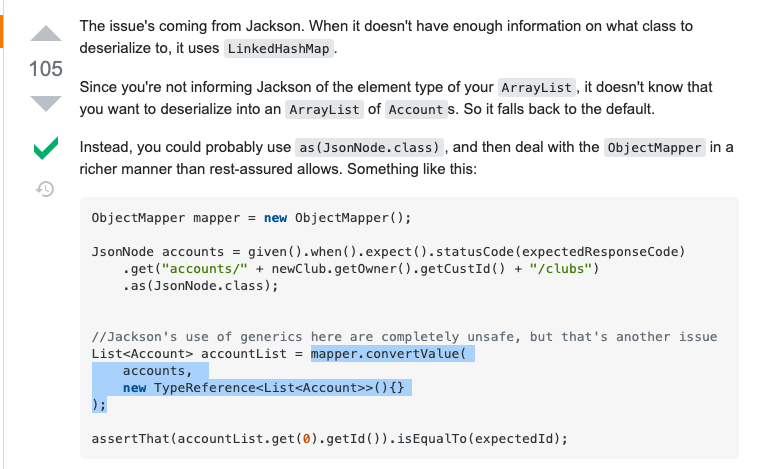
因為在測試名字這裡只寫這樣 val userList: List<User>? = response.body 的話,Jackson 會無法順利轉型,所以 List 會反序列化成 LinkedHashMap (如 debug 裡面顯示的型態),所以後來多加了 private val objectMapper = ObjectMapper() 指定型態來轉型,也就是這段
        // 測試名字
        val userList: List<User>? = objectMapper.convertValue(
                response.body,
                object : TypeReference<List<User>>() {}
        )
        log().info(userList.toString())
這問題是參考這裡解決的
logging in Spring Kotin
另外因為 debug 的過程中,讓我覺得資訊不夠,所以我還手動加了 log。
以往在 Java 會使用 lombok 提供的 @Slf4j 或 @Log4j2,但在 Kotlin 中因為不能用 lombok 了,所以就要自己加。
參考這篇的話 https://www.baeldung.com/kotlin-logging
目前最漂亮的解法就是做一個 logging 的 interface,其他 class 去繼承,就可以順順的使用了!
import org.slf4j.LoggerFactory.getLogger

interface Logging {

    fun <T : Logging> T.log() = getLogger(javaClass)
}
像是這樣使用,繼承了 : Logging {
使用是這樣log().info(userList.toString())
@SpringBootTest(webEnvironment = SpringBootTest.WebEnvironment.RANDOM_PORT)
internal class UserRestControllerTest(@Autowired val restTemplate: TestRestTemplate): Logging {

    private val objectMapper = ObjectMapper()

    @Test
    internal fun `test findByUsername `() {
			....

				log().info(userList.toString())

			....
    }
}
綠燈
修正完後,就測試成功啦!
我有把其他的方法都完成,但沒有寫測試
今天就先講到這!我們明天見!